Guide design with geology (display blocks)
Designing activity areas without geological context can lead to inefficiencies, dilution, or misalignment with grade control objectives. XECUTE allows you to visualise block model data directly in the 3D scene while you draw, edit, or review activity areas. This capability helps you design areas that respect ore boundaries, meet cut-off requirements, and optimise material flow.
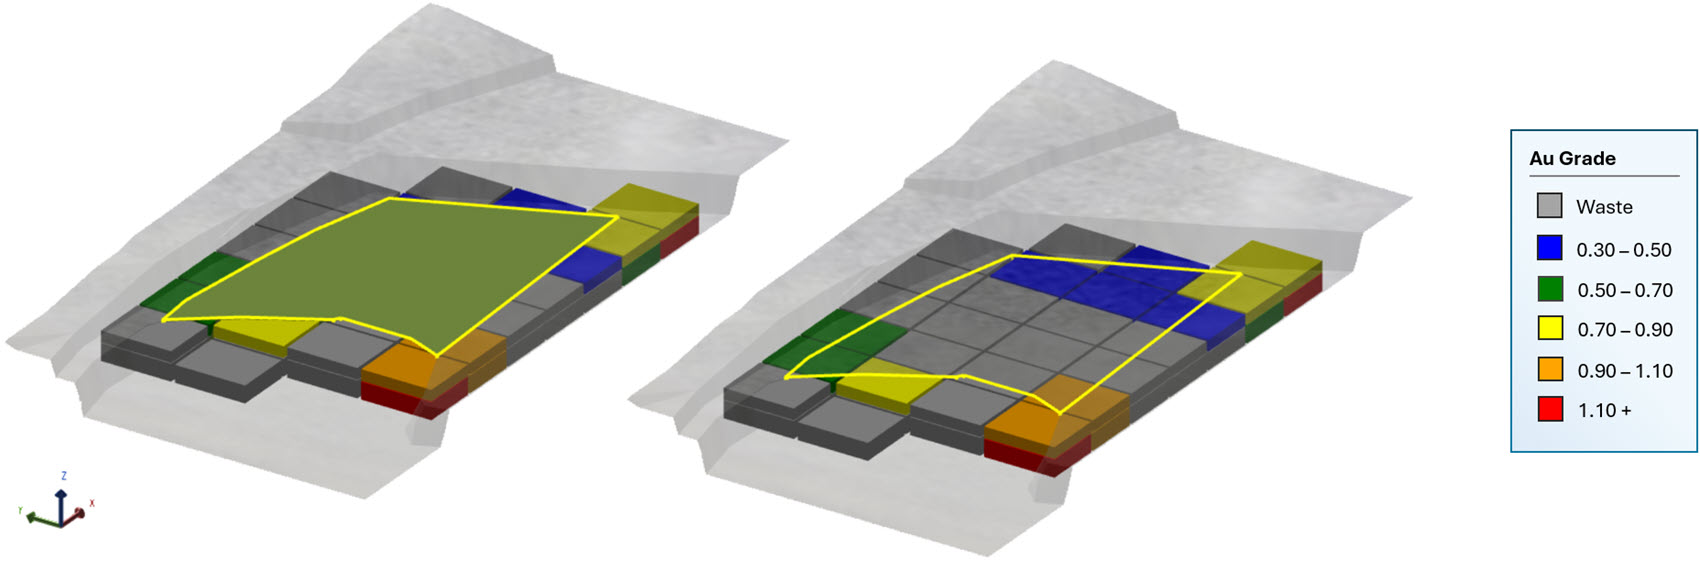
Viewing the block model blocks that intersect an activity area. On the left, the activity area solid shown. On the right, the activity area wireframe is shown. With the wireframe view, it’s easier to see the blocks within.
Why use block model data during design?
Block models contain the geological and quality attributes that underpin your mine plan. By viewing these blocks while creating or adjusting activity areas, you can:
-
Target ore zones above a specific grade threshold.
-
Avoid including waste or low-grade material in high-value areas.
-
Validate that the planned shape aligns with orebody geometry and operational constraints.
-
Reduce rework by designing with full visibility of geological context.
This approach turns the 3D scene into a live design environment where spatial and geological data work together.

Viewing block model blocks with a legend based on Density values
Editing an activity area while viewing the intersecting block model blocks with a gold grade legend
Block display modes
XECUTE provides three display modes for block visualisation in the 3D scene. Toggle between them by pressing B while an activity area is selected:
-
Off (NO BLOCKS): Hides all block model data.
-
Blocks (BLOCKS): Shows the activity area’s intersecting blocks in 3D.
-
Aggregated section (AGG BLOCKS): Displays an aggregated view of intersected blocks, shading each vertical column by an aggregated value (e.g., weighted average grade).
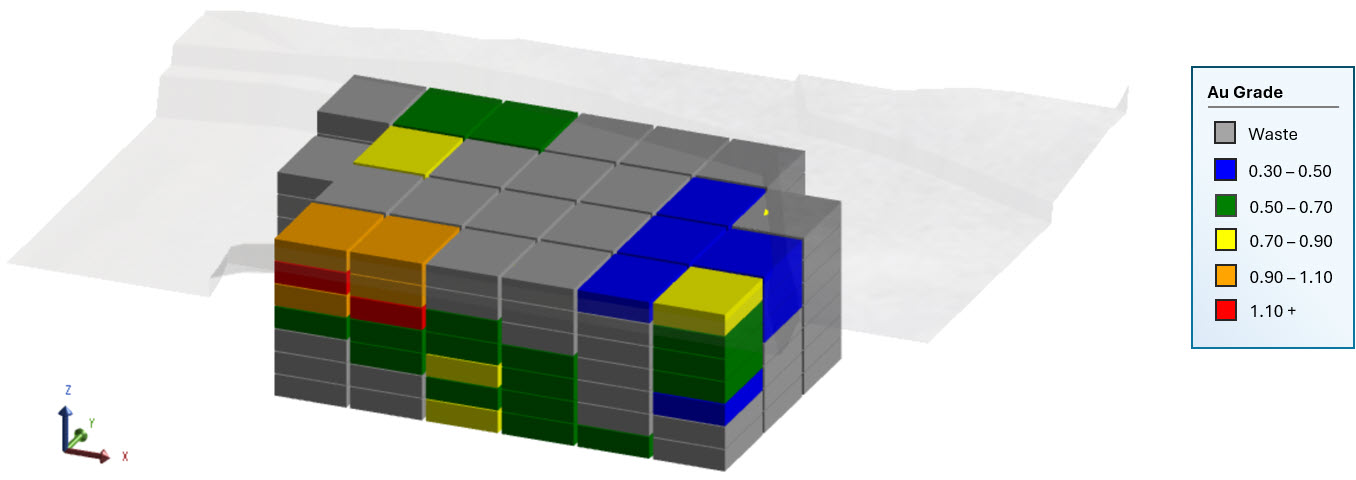
Using the BLOCKS display mode
Aggregated view simplifies interpretation when bench height intersects many small blocks. Instead of showing every block, it colours each column based on an aggregated property (such as average grade). This makes it easier to:
-
Identify whether an area is predominantly ore or waste.
-
Spot grade trends without being distracted by block-level variability.
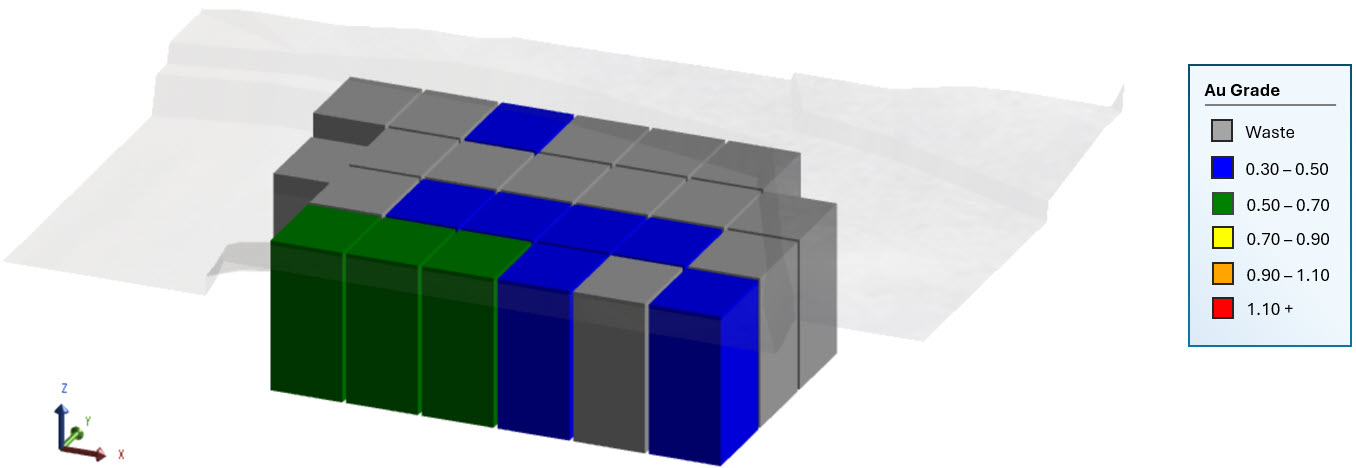
Using the AGG BLOCKS display mode
Legends: controlling how geology is visualised
Legends define how blocks are coloured. You could create a legend based on attributes like grade, density, oxidation index, moisture, recovery, calculated economic value, sulphur content, and so on.
For a given legend, you select the evaluated attribute. You then define each band’s upper and lower values and associated colour. When you apply the legend, the software evaluates each visualised block model block and accordingly assigns a block a legend colour/entry.
Access legend setup
To set up block model legends, go to Config > System Configuration ![]() > Legends
> Legends ![]() .
.
Create a custom legend
-
Go to the legends setup.
-
Click Add.
-
Enter the property inputs (name, evaluated field, and default colour).
-
In Legend Rules, click Add for each range.
For a given range, assign a name, lower and upper value to define the range limits, and a unique colour.
-
Click Save.
Legend properties
Each legend uses a selected principal field to evaluate and assign colours to blocks. Principal fields are numeric or categorical attributes from the block model (such as grade, density, or oxidation state) that are relevant for planning and reporting.
|
Legend |
|
|
Name |
Assigns a name to the legend. |
|
Field |
Selects the principal field to evaluate when colouring blocks. Principal fields are key attributes from the block model, such as Au grade, Density, or other quality indicators. The legend uses this field’s values to determine which colour range applies to each block. |
|
Default Colour |
Specifies the colour applied to any block that does not fall within a defined legend range. |
Legend rules
Each legend consists of one or more rules, and each rule defines a band, which is a range of values for the selected field. These bands determine how blocks are coloured in the 3D scene. By creating multiple rules, you can represent different grade ranges or material properties with distinct colours.
|
Field |
Description |
|---|---|
|
Name |
The label for the band (e.g., High Grade, Low Grade). This name appears in the legend list and helps users interpret the colour scheme. |
|
Lower Value |
The minimum value of the selected field for this band. Blocks with values equal to or greater than this number fall into the band (unless they exceed the upper limit). |
|
Upper Value |
The maximum value of the selected field for this band. Blocks with values less than or equal to this number fall into the band. |
|
Colour |
The colour assigned to blocks in this band. Each band should have a unique colour for clarity. |
You can add or remove bands as needed to represent the full range of values. For example, a gold grade legend might include:
-
Low Grade: 0.0 - 0.5 g/t (grey)
-
Medium Grade: 0.5 - 1.5 g/t (yellow)
-
High Grade: 1.5+ g/t (orange)
Legend options
|
Legend |
|
|
Add |
Creates a new legend. You’ll need to define its properties (name, field, default colour) and set up legend rules for value ranges. |
|
Remove |
Deletes the selected legend from the list. This action cannot be undone, so confirm before removing. |
|
Save |
Saves any changes made to the current legend, including edits to properties or rules. |
Display block model blocks within an activity area
-
In Client, within the 3D scene, select the activity area.
-
Press the B key, or click a BLOCKS option on the toolbar, to display intersecting blocks.
You can toggle between different block visualisation modes.
-
In the Properties panel, go to Block Legend > Display Legend.
-
Choose a legend.
Once applied, the blocks intersecting the activity area are displayed according to the legend’s colour scheme.